- Published on
Insta-Next: Creating Posts and Stories with POST Requests
- Authors

- Name
- Hoh Shen Yien
In this part, we will start to add posts and stories creation in our InstaNext. At the same time, we will use Zod to validate form inputs from the frontend and request bodies in the backend. Finally, we will build the missing registration form.
As a bonus, I'll also implement a Drag and Sortable Gallery for the Post Creation modal.
If you have skipped all previous parts, here's the complete codes from the last part.
Sneak Peek:
Zod
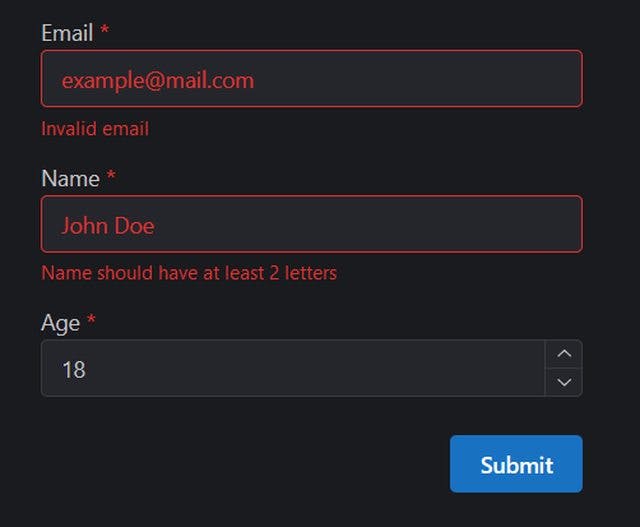
Zod is a form validation library. Using Zod, we don't need to go over the nitty-gritty of writing validation rules. All we need is a schema object that expresses the validation rules in Zod. You can also define custom error message using it.
Installation
Let's install it
PS: If you haven't install @mantine/form, do install it too, it was installed in our part 1.
yarn add zod
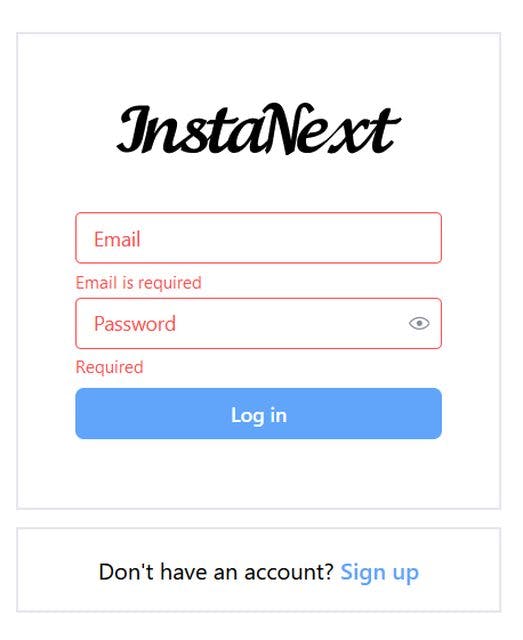
Login Form
Now, we will create our first validation for login form. Let's look back at our LoginForm.tsx. Everything from Zod will come from the z of Zod. The form starts from an object, where each property will represent each field of the form.
// src/components/auth/LoginForm.tsx
import { z } from 'zod'

const loginSchema = z.object({
  email: z.string().email('The email is invalid').min(1, 'Email is required'),
  password: z.string().min(1, 'Password is required'),
})
Then, we can pass the schema to the Mantine's use-form and use Mantine's zodResolver to adapt it to Mantine.
// src/components/auth/LoginForm.tsx
...
const LoginForm = () => {
  const form = useForm<{ email: string; password: string }>({
    validate: zodResolver(loginSchema),
  });
Now, open up your localhost, you should see the error messages showing fine
POST Requests
Sign Up
Now that we have the power of form validation, let's try to build a sign up API post request. For user registration, let's put it in the POST /users, so we will build on top of /user/index.ts file.
API
Firstly, we need to make sure that only POST (and GET) request is being accepted to this path, let's check it
// src/pages/api/users/index.ts
import { User } from '@prisma/client'
import type { NextApiRequest, NextApiResponse } from 'next'
import { AttachImage } from '@/features/images/attach-image'
import findManyUsers from '@/features/users/findManyUsers'

export type AllUsersData = {
  users: AttachImage<User, 'user'>[]
}

export default async function handler(req: NextApiRequest, res: NextApiResponse<AllUsersData>) {
  if (req.method == 'GET') {
    const users = await findManyUsers()
    res.status(200).json({ users })
  } else if (req.method == 'POST') {
    // do something
  } else {
    // method not allowed
    res.status(405)
  }
}
Next, we want to retrieve the information from the request. Let's look back at our schema.prismawhat are the information that we need,
model User {
  id          String         @id @default(cuid())
  username    String         @unique
  email       String         @unique
  password    String
  description String         @default("")
  created_at  DateTime       @default(now())
  ...
}
That's it, we need username, email, password, and description. Let's write the type in the features, we will need it later
// src/features/users/signUpUser/signUpUser.schema.ts
// I placed these types and schema in a separate file to avoid importing Prisma in frontend in signUpUser.ts
export type SignUpUserParams = {
  email: string
  username: string
  password: string
  description?: string
}
At the same time, let's write yet another Zod schema to validate the request. This prevents user from passing invalid values
// src/features/users/signUpUser/signUpUser.schema.ts
...
export const signUpUserSchema = z.object({
  email: z.string().min(1, "Email is required").email("Email is invalid"),
  username: z.string().min(1, "Username is required"),
  password: z.string().min(1, "Password is required"),
  description: z.string().nullable(),
});
Using this schema, we can test the values passed by the client. To retrieve the values passed by client, you can simply get the body of the request in the API handler.
The parse method from zod schema will determine if the object is valid, and clone the values. This prevents the client from passing additional unnecessary fields. If the value is invalid, say, the email is missing, then error will be thrown.
// src/pages/api/users/index.ts
...
  } else if (req.method == "POST") {
    const body = signUpUserSchema.parse(req.body);
  } else {
...
Finally, we will create and return the user object
// src/features/users/signUpUser/signUpUser.ts
import prisma from "@/utils/prisma";
import { SignUpUserParams } from "./signUpUser.schema";
import hashPassword from "@/features/password/hashPassword";

export default async function signUpUser(data: SignUpUserParams) {
  const user = await prisma.user.create({
    data: {
      ...data,
      // don't forget to hash the password instead of storing the plaintext!
      password: await hashPassword(data.password),
    },
  });
  // Let's give every user a default profile picture
  // You can refer to https://www.dicebear.com/ for the usage of API
  await prisma.image.create({
    data: {
      type: "user",
      associated_id: user.id,
      sequence: 0,
      url: `https://api.dicebear.com/6.x/adventurer/png?seed=${user.email}`,
    },
  });
  return user;
}

// src/pages/api/users/index.ts
...
  } else if (req.method == "POST") {
    const body = signUpUserSchema.parse(req.body);
    res.status(201).json({ user: await signUpUser(body) });
  } else {
...
However, there's one minor issue with types here
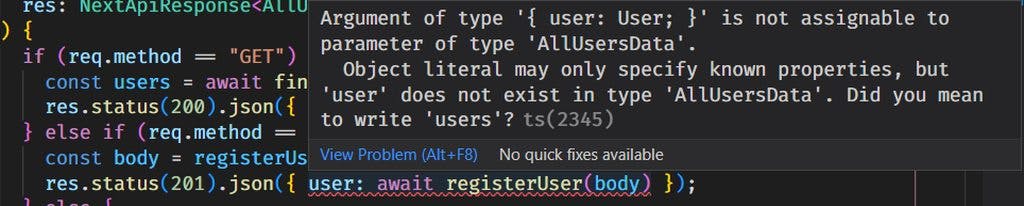
Looking at the error, you can probably guess it, we defined the return data to be of type AllUsersData which obviously doesn't match with this {user: User} type. To solve this issue, we can simply add a type to the method signature
// src/pages/api/users/index.ts
export type CreatedUserData = {
  user: User;
};

export default async function handler(
  req: NextApiRequest,
  res: NextApiResponse<AllUsersData | CreatedUserData>
) {
  ...
}
Disclaimer: NextAuth has an implementation for user registration using email authentication, however, we have not touched on email service & it only creates users with email without other fields, so it's less flexible.
Registration Form
Finally, let's build the registration form, again, we will copy the design from Instagram itself, and add our own fields

To do this, we can copy over the LoginForm created from the last part, and make some modifications to get the fields correct
// src/components/auth/SignUpForm.tsx
import { useForm, zodResolver } from '@mantine/form'
import { Button, Image, PasswordInput, TextInput, Textarea } from '@mantine/core'
import Link from 'next/link'
import { SignUpUserParams, signUpUserSchema } from '@/features/users/signUpUser/signUpUser.schema'

const SignUpForm = () => {
  const form = useForm<SignUpUserParams>({
    validate: zodResolver(signUpUserSchema),
  })

  return (
    <div className="flex flex-col items-center justify-center">
      <div className="w-[360px]">
        <form
          className="border-2 border-solid border-gray-200 px-10 py-12"
          onSubmit={form.onSubmit((values) => console.log(values))}
        >
          <Link href="/">
            <Image src="/brand.svg" alt="InstaNext" width="200" className="mx-auto" />
          </Link>
          <div className="mt-6 text-center font-semibold text-gray-600">
            Sign up to see photos and videos from your friends
          </div>
          <div className="mt-10 space-y-1 ">
            <TextInput placeholder="Email" {...form.getInputProps('email')} />
            <TextInput placeholder="Username" {...form.getInputProps('username')} />
            <PasswordInput placeholder="Password" {...form.getInputProps('password')} />
            <Textarea placeholder="Description" {...form.getInputProps('description')} />
          </div>
          <Button fullWidth className="mt-2 rounded-md bg-blue-400 hover:bg-blue-500" type="submit">
            Sign Up
          </Button>
        </form>
        <div className="mt-3 border-2 border-solid border-gray-200 py-4 text-center">
          Have an Account?{' '}
          <Link href="/" className="font-semibold text-blue-400">
            Log in
          </Link>
        </div>
      </div>
      <div className="mt-12 text-center text-sm text-gray-400">
        InstaNext - Instagram Clone by{' '}
        <Link href="https://shenyien.cyou" target="_blank" className="text-blue-400">
          Shen Yien
        </Link>
      </div>
    </div>
  )
}

export default SignUpForm
Including it in the auth/sign-up.tsx, which is the registration route as mentioned in the last part
import SignUpForm from '@/components/auth/SignUpForm'
import { NextPageWithLayout } from '../_app'

const SignUpPage: NextPageWithLayout = () => {
  return (
    <div className="mt-12 flex justify-center">
      <SignUpForm />
    </div>
  )
}

// Do not block unauthenticated user from accessing this page
SignUpPage.isPublic = true
// Prevents SignUpPage from using default layout
SignUpPage.getLayout = (page) => {
  return <>{page}</>
}

export default SignUpPage
Finally, let's navigate to localhost:3000/auth/sign-up, or clicks the sign up from our login page,

Simple form, but it does the job. It will validate the inputs upon clicking Sign Up, however, there's only one thing left, making the POST request.
useMutation
Like GET requests, we need to create the API function, let's place it in our src/api/users folder,
// src/api/users.ts
export const signUpUser = async (data: SignUpUserParams): Promise<CreatedUserData> => {
  const user = await axios.post(`/api/users`, data)
  return user.data
}
Looking at how much we are using the type created, aren't you glad that we declared it earlier?
Finally, we will make use of React-Query's useMutation to make the POST requests. It's almost equivalent to useQuery, with the exception that the mutation function must accept a data argument.
// src/components/auth/SignUpForm.tsx
const SignUpForm = () => {
  ...
  const signUp = useMutation({
    mutationFn: signUpUser,
  });
...
Finally, we can just call the mutate function in our form.onSubmit to trigger the mutation / POST request
// src/components/auth/SignUpForm.tsx
const SignUpForm = () => {
  ...
        <form
          className="border-gray-200 border-solid border-2 px-10 py-12"
          onSubmit={form.onSubmit((values) => signUp.mutate(values))}
        >
  ...
}
It's time to test, since we haven't implemented any success message, let's open up the dev console and submit a form
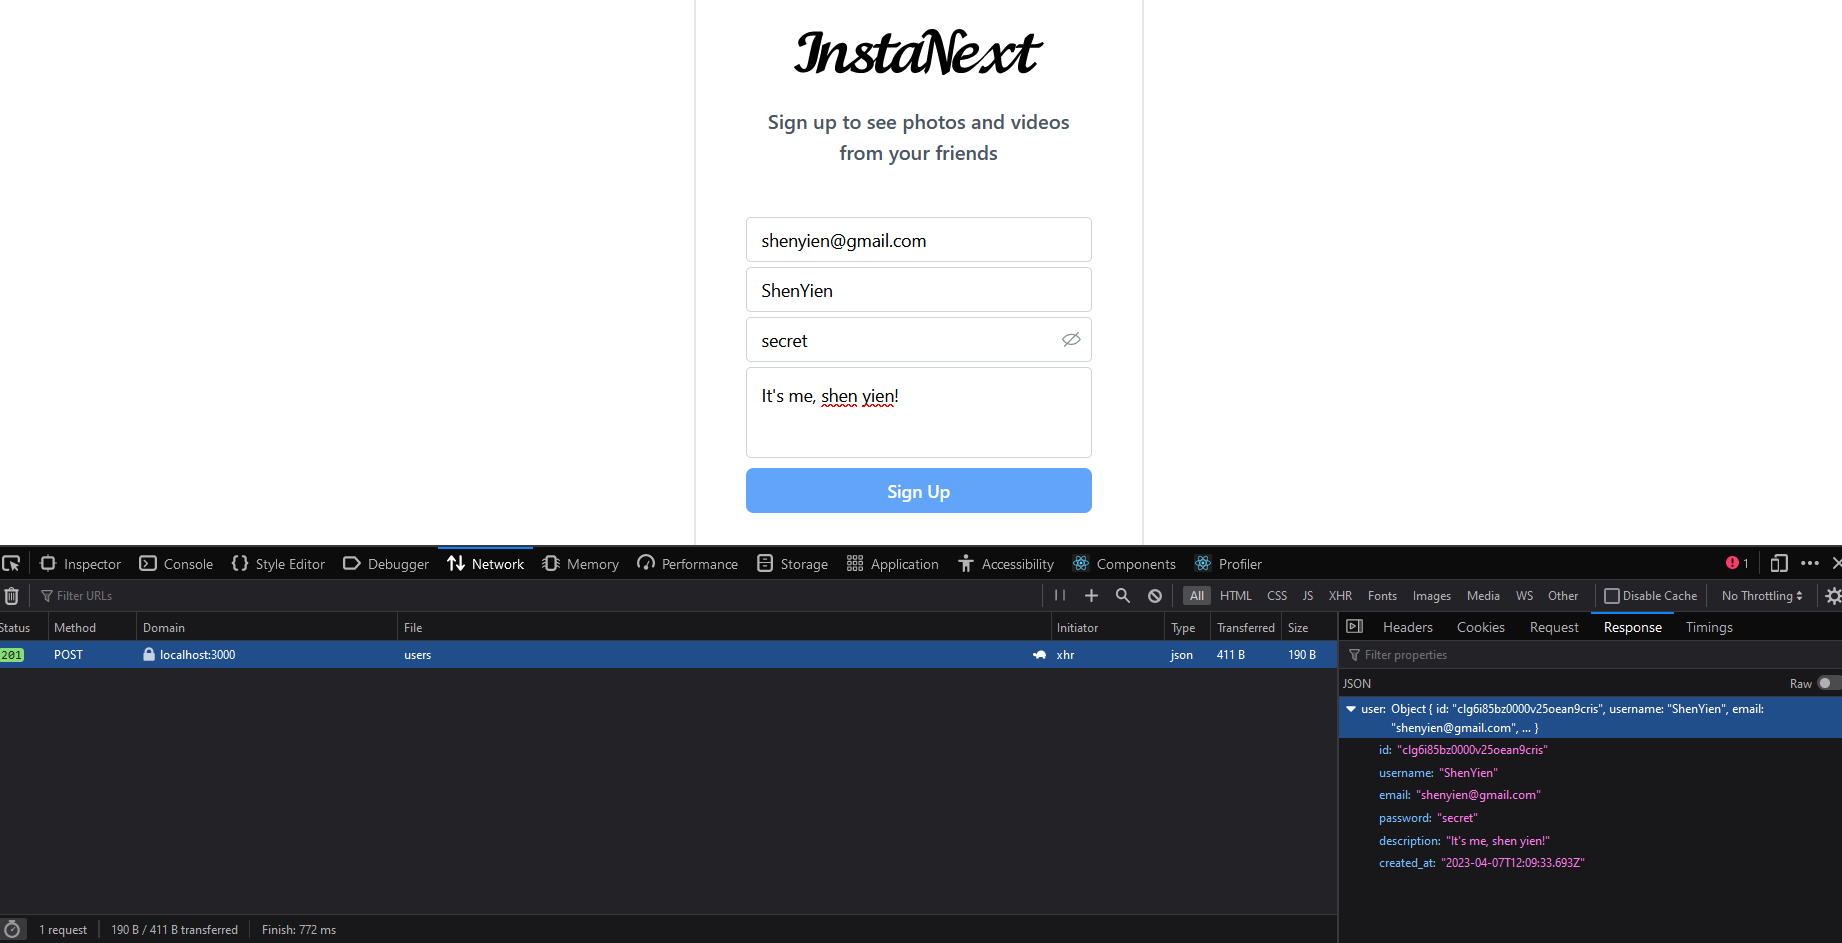
All good and working! Next, we certainly don't want to leave users hanging and waiting when the request is successful.
Improving UX
We can show the users a success notification, and redirect the users to login page on success. Moreover, we will want to disable the button temporarily while the server processes the request so that the user doesn't spam it.
For the notifcations, we will use Mantine's notifications system. Let's install it
yarn add @mantine/notifications
Then, we need to include the Notifications component in our _app.tsx
// src/pages/_app.tsx
...
            <MantineProvider
              withGlobalStyles
              withNormalizeCSS
              theme={{
                colorScheme: "light",
              }}
            >
              <ModalsProvider modals={modals}>
                <AuthGuard Component={Component} pageProps={pageProps} />
              </ModalsProvider>
              {/* Here */}
              <Notifications />
            </MantineProvider>
...
Then, we can simply call the notification anywhere in our frontend using
showNotification({
  message: 'You have signed up successfully! You may login now.',
  color: 'green',
})
Let's add it to the onSuccess parameter of our useMutation from the SignUpForm earlier
// src/components/auth/SignUpForm.tsx
...
  const signUp = useMutation({
    mutationFn: signUpUser,
    onSuccess: () => {
      showNotification({
        message: "You have signed up successfully! You may login now.",
        color: "green",
      });
    },
  });
...
At the same time, we mentioned redirecting the user right? That's simiple. We will get the router object from Next.js, and push the new route into it
// src/components/auth/SignUpForm.tsx
...
const SignUpForm = () => {
  const form = useForm<SignUpUserParams>({
    validate: zodResolver(signUpUserSchema),
  });

  const router = useRouter();
  const signUp = useMutation({
    mutationFn: signUpUser,
    onSuccess: () => {
      // redirect the user back to homepage
      router.push("/");
      showNotification({
        message: "You have signed up successfully! You may login now.",
        color: "green",
      });
    },
  });
...
Finally, to get the loading state of the mutation, we don't need explicit useState here. The state is controlled by the useMutation itself. Thus, you can simply call signUp.isLoading to check the loading state, and pass it to the Button
// src/components/auth/SignUpForm.tsx
...
          </div>
          <Button
            fullWidth
            className="mt-2 bg-blue-400 hover:bg-blue-500 rounded-md"
            type="submit"
            // Disables the button when the request is pending for response
            loading={signUp.isLoading}
          >
            Sign Up
          </Button>
...
After finishing all these, it's time to test it out, let's resubmit a sign-up form again.

I didn't manage to capture the loading state, but here's the success notification, and you should see a redirect back to the login page. You can login to check out the account that you just created!
PS: I haven't do anything to handle error request, that would be in the future
Post Creation
Moving on, we will start creating posts.
API
It's almost equivalent to the signUpUser. You can start with creating the type & schema, followed by the Prisma action.
But before that, I decided to tackle Image first. Using the same file structure, I built the types and actions
// src/features/images/createImage/createImage.schema.ts
import { z } from 'zod'

// The params here refers to all the inputs that will be provided by user
// type & associatedId will be provided by us
type CreateImageParams = {
  url: string
  sequence?: number
}

// We will use it later to build Post Schema
export const createImageSchema = z.object({
  url: z.string().url('Invalid URL'),
  sequence: z.number().gte(0),
})

// src/features/images/createImage/createImage.ts
import prisma from '@/utils/prisma'

// Alternatively, you can use a single object as argument
export default async function createImage(
  image: CreateImageParams,
  type: string,
  associatedId: string
) {
  return await prisma.image.create({
    data: {
      sequence: 0,
      ...image,
      type,
      associated_id: associatedId,
    },
  })
}
Using these functions, we can create the types and actions for our Post.
It's pretty straightforward, we just need to create the Prisma objects based on the data passed.
// src/features/posts/createPost/createPost.schema.ts
import { z } from 'zod'

export type CreatePostParams = {
  caption: string
  images: CreateImageParams[]
}

export const createPostSchema = z.object({
  caption: z.string().min(1, 'Caption is required'),
  // The images will be an array, so it'll be verified by z.array
  // The objects in the array should fulfill the createImageSchema
  images: z.array(createImageSchema).min(1, 'There should be at least 1 image'),
})

// src/features/posts/createPost/createPost.ts
import createImage from '@/features/images/createImage/createImage'
import { CreatePostParams } from './createPost.schema'
import prisma from '@/utils/prisma'

export default async function createPost(data: CreatePostParams, userId: string) {
  const post = await prisma.post.create({
    data: {
      // Prisma will throw error if we pass in additional fields to data
      caption: data.caption,
      user: {
        connect: {
          id: userId,
        },
      },
    },
  })

  for (const image of data.images) {
    await createImage(image, 'post', post.id)
  }

  return post
}
Finally, let's plug the action into our API route. This process is almost identical to creating the user, so I'll just speed it up.
import { Post, User } from '@prisma/client'
import type { NextApiRequest, NextApiResponse } from 'next'
import { AttachImage } from '@/features/images/attach-image'
import findFollowingPosts from '@/features/posts/findFollowingPosts'
import { getServerSession } from 'next-auth'
import { authOptions } from '../auth/[...nextauth]'
import { createPostSchema } from '@/features/posts/createPost/createPost.schema'
import createPost from '@/features/posts/createPost/createPost'

export type PostWithAuthor = AttachImage<Post, 'post'> & {
  _count: {
    liked_bys: number
  }
  user: AttachImage<User, 'user'>
}

export type AllPostsData = {
  posts: PostWithAuthor[]
}

// New response type for POST request
export type CreatedPostData = {
  post: Post
}

export default async function handler(
  req: NextApiRequest,
  // don't forget to update the response type
  res: NextApiResponse<AllPostsData | CreatedPostData>
) {
  const currentSession = await getServerSession(req, res, authOptions)
  // We first check the request method
  if (req.method == 'GET') {
    const posts = await findFollowingPosts(currentSession?.user.id ?? '')
    res.status(200).json({ posts })
  } else if (req.method == 'POST') {
    // Then check if the request data is correctly formatted
    const data = createPostSchema.parse(req.body)
    // Calling the action
    const post = await createPost(data, currentSession?.user.id ?? '')
    // and return the created post
    res.status(201).json({ post })
  } else {
    // Method not allowed
    res.status(405)
  }
}
Our API route is done now, next up will be our frontend!
Frontend
Well, Instagram has some cool features for handling images, but we are a simple tutorial! So we will be building a stripped-down version.
So here's how it should work,
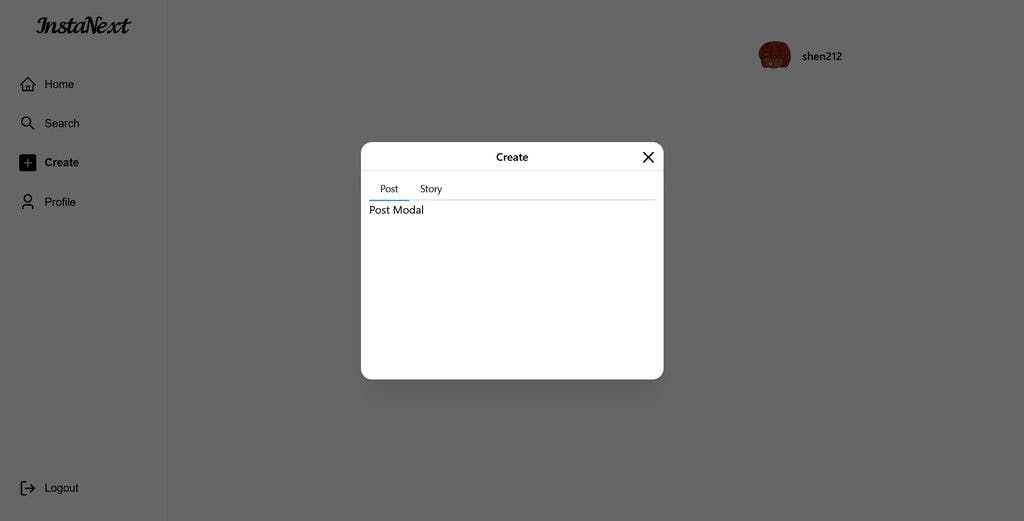
- Clicking on the Create button on the side bar should show a modal
- Can select the type of content (post / story)
- Can add a caption to the content
- To add an image, submit the url (we have yet to talk about file handling in Next.js, stay tune to it)
- Bonus: We will allow the rearrangement of the image later!
Let's get to work!
Modal
Looking back on part 4, we know that we'll need to declare some props for this new modal. However, the create does not need any prop, so we can ignore it, let's just proceed with the modal itself.
Before that, since we're sharing the same modal for both createPost and createStory let's change to call it createModal
// src/utils/modals/constants.ts
export const postLikesModal = 'PostLikes'
export const postModal = 'Post'
export const createModal = 'Create'
export const storyModal = 'Story'

export type ModalType =
  | typeof postLikesModal
  | typeof createModal
  | typeof postModal
  | typeof storyModal

// src/utils/modals/types.ts
import { createModal, postLikesModal, postModal, storyModal } from './constants'

export type ModalInnerProps = {
  [key in typeof postLikesModal]: {
    postId: string
  }
} & {
  [key in typeof createModal]: {}
} & {
  [key in typeof postModal]: {
    postId: string
  }
} & {
  [key in typeof storyModal]: {
    index: number
  }
}
Let's build the modal. You can use Mantine's tabs to switch between the two
// src/components/modals/CreateModal.tsx
import { createModal } from '@/utils/modals/constants'
import { ModalInnerProps } from '@/utils/modals/types'
import { ContextModalProps } from '@mantine/modals'
import { Tabs } from '@mantine/core'
import ModalLayout from './ModalLayout'

const CreateModal = ({
  innerProps: {},
}: ContextModalProps<ModalInnerProps[typeof createModal]>) => {
  return (
    <ModalLayout title="Create">
      <Tabs defaultValue="post">
        <Tabs.List>
          <Tabs.Tab value="post">Post</Tabs.Tab>
          <Tabs.Tab value="story">Story</Tabs.Tab>
        </Tabs.List>

        <Tabs.Panel value="post">Post Modal</Tabs.Panel>
        <Tabs.Panel value="story">Story Modal</Tabs.Panel>
      </Tabs>
    </ModalLayout>
  )
}

export default CreateModal
We will implement the internal content next. Before that, let's update the our modals.ts to include this modal
// src/utils/modals/modals.ts
import PostLikedModal from '@/components/modals/PostLikedModal'
import PostModal from '@/components/modals/PostModal'
import { createModal, postLikesModal, postModal, storyModal } from './constants'
import StoryModal from '@/components/modals/StoryModal'
import CreateModal from '@/components/modals/CreateModal'

export const modals = {
  [postLikesModal]: PostLikedModal,
  [postModal]: PostModal,
  [storyModal]: StoryModal,
  [createModal]: CreateModal,
}
Also, we might want to test this CreateModal, so let's update our SideBar.tsx
// src/components/sidebar/SideBar.tsx
const links = [
  ...
  {
    name: "Create",
    route: "/#create-modal",
    IconLine: BsPlusSquare,
    IconFilled: BsFillPlusSquareFill,
    onClick: () =>
      openModal({
        type: createModal,
        innerProps: {},
      }),
  },
];

...
                <SideBarButton
                  key={index}
                  Icon={isActive ? link.IconFilled : link.IconLine}
                  text={link.name}
                  href={link.route}
                  isActive={isActive}
                  onClick={link.onClick}
                />
              );
            })}
...

export default SideBar;
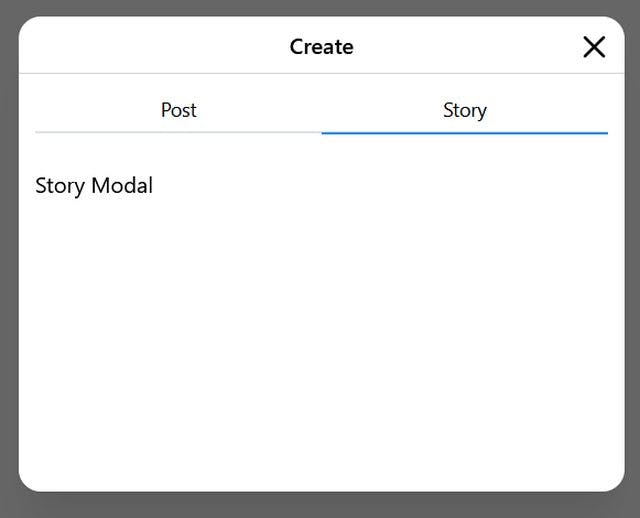
All is good. Opening it up, we can see that the tab is a bit badly designed, let's fix it a little.
I decided to just stretch the tab to full width, better matching Instagram's style overall
// src/components/modals/CreateModal.tsx
...
      <Tabs
        defaultValue="post"
        classNames={{ tabsList: "mb-6", tab: "flex-1" }}
      >
...
Not the best tabs design, but it'll do!
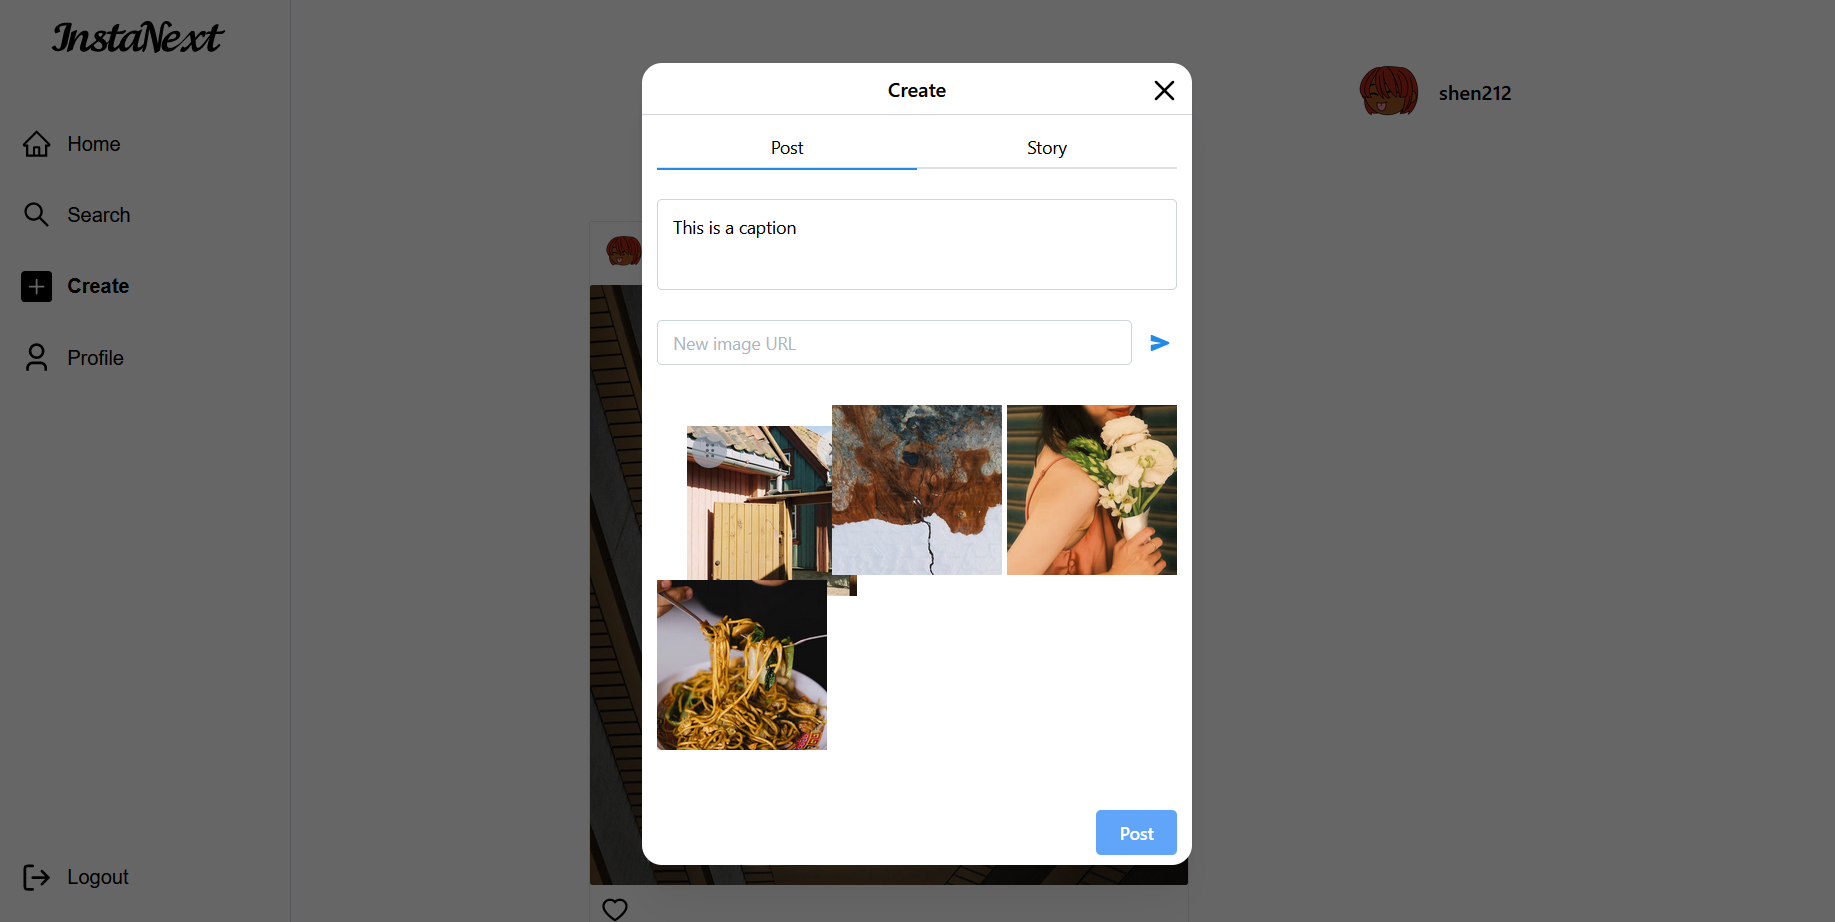
Create Post Form
Let's move on with our Post Creation. Here's a rough draft that I have in my mind
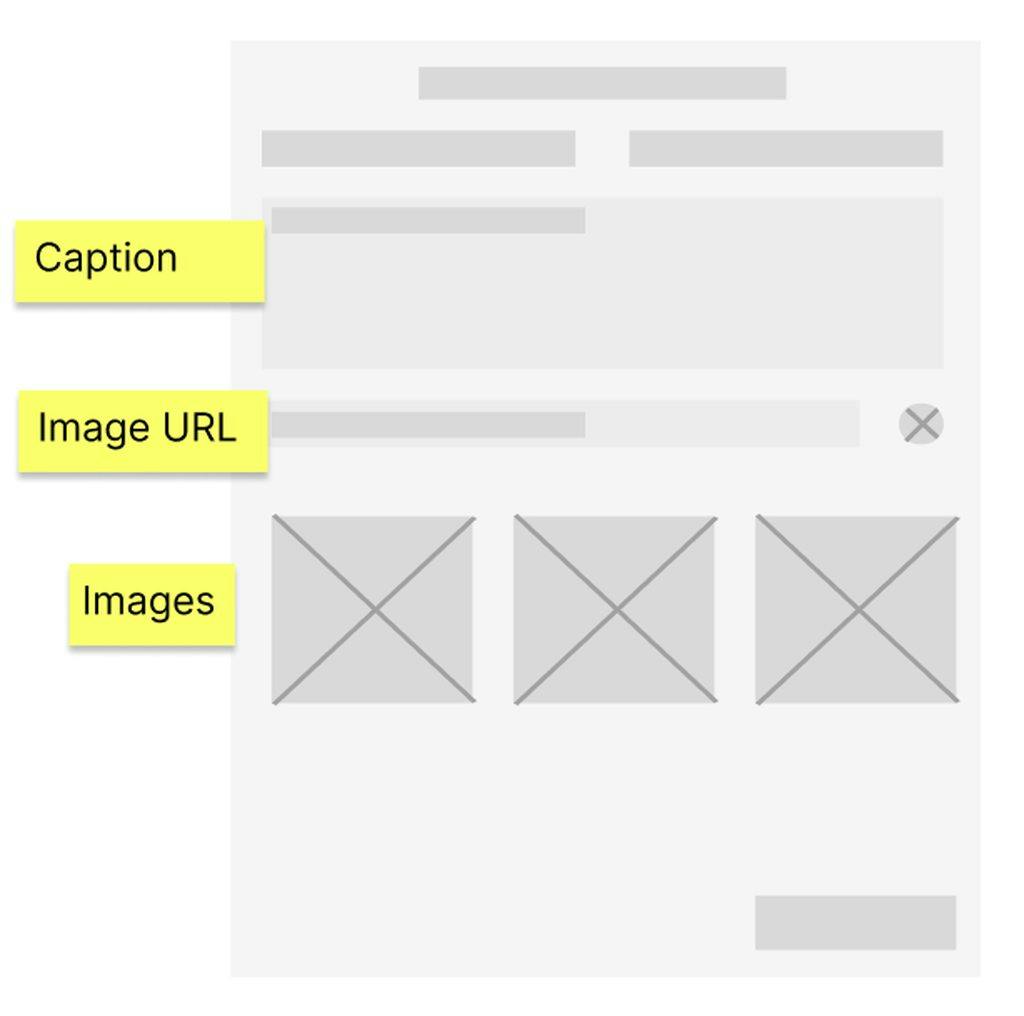
From there, we can see that the image URL part is probably a separate function that needs to validate the URL on its own. We will ignore it for now, and build the overall component first.
Here I used a nested field for forms
import { CreatePostParams, createPostSchema } from '@/features/posts/createPost/createPost.schema'
import { useForm, zodResolver } from '@mantine/form'
import { Textarea, Text, Image, Button } from '@mantine/core'

const CreatePost = () => {
  const form = useForm<CreatePostParams>({
    validate: zodResolver(createPostSchema),
    initialValues: { caption: '', images: [] },
  })

  return (
    <form
      onSubmit={(evt) => {
        evt.preventDefault()
      }}
    >
      <Textarea placeholder="Post Caption..." {...form.getInputProps('caption')} />

      {/* Image URL component */}
      <div className="mt-8 grid grid-cols-3 gap-1">
        {form.values.images.map((image) => {
          return (
            <Image
              src={image.url}
              alt={image.url}
              fit={'cover'}
              key={image.sequence}
              withPlaceholder
              placeholder={<Text align="center">The image is broken</Text>}
              classNames={{
                root: 'aspect-square',
                figure: 'h-full',
                imageWrapper: 'h-full',
                image: '!h-full',
                placeholder: 'bg-gray-100',
              }}
            />
          )
        })}
      </div>
      <div className="mt-12 flex justify-end">
        <Button type="submit" className="bg-blue-400 hover:bg-blue-500">
          Post
        </Button>
      </div>
    </form>
  )
}

export default CreatePost
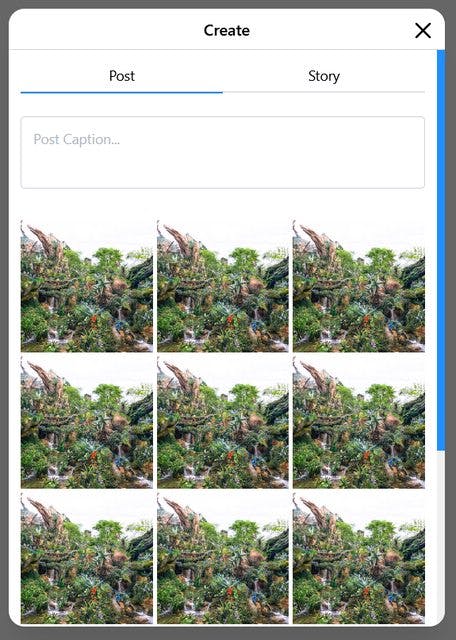
Here's how it looks like now.
I have added some pictures programmatically, so don't mind me
While building this modal, I noticed some minor issue with overflow for the modal there, so I updated a little on the sizes in ModalLayout
// src/components/modals/ModalLayout.tsx
...
      <div
        className={clsx(
          "min-h-[40vh] max-h-[95vh] overflow-y-auto",
          {
            "py-2 px-3": padding,
            // The max height should be lesser if title is present
            // as title occupies some spaces
            "max-h-[95vh]": !title,
            "max-h-[80vh]": title,
          },
          "relative"
        )}
      >
...
Finally, let's build the ImageUrl component. It's relatively straight forward, it will validate the URL, and pass the values up to CreatePost.
// src/components/posts/CreatePost/ImageUrl.tsx
import {
  CreateImageParams,
  createImageSchema,
} from '@/features/images/createImage/createImage.schema'
import { ActionIcon, TextInput } from '@mantine/core'
import { useForm, zodResolver } from '@mantine/form'
import { IoSend } from 'react-icons/io5'

interface ImageUrlProps {
  onSubmit: (image: CreateImageParams) => void
}

const ImageUrl = ({ onSubmit }: ImageUrlProps) => {
  const defaultImageValues = () => ({
    url: '',
    // let's take sequence as the key by default, we will rearrange the sequence
    // on submit
    sequence: Math.ceil(Math.random() * 9999),
  })
  const newImage = useForm<CreateImageParams>({
    validate: zodResolver(createImageSchema),
    initialValues: defaultImageValues(),
  })

  const onNewImageSubmit = () => {
    newImage.onSubmit((values) => {
      onSubmit(values)
      newImage.setValues(defaultImageValues())
    })()
  }

  return (
    // Note that I didn't use form here, because nested form is not allowed
    // and I planned to use form from the outside
    <div className="mt-6 flex items-start space-x-2">
      <TextInput
        placeholder="New image URL"
        {...newImage.getInputProps('url')}
        className="flex-1"
        onKeyDown={(evt) => {
          if (evt.key == 'Enter') {
            onNewImageSubmit()
            evt.preventDefault()
          }
        }}
      />
      <div className="flex h-[36px] items-center">
        <ActionIcon color="blue" onClick={onNewImageSubmit}>
          <IoSend />
        </ActionIcon>
      </div>
    </div>
  )
}

export default ImageUrl
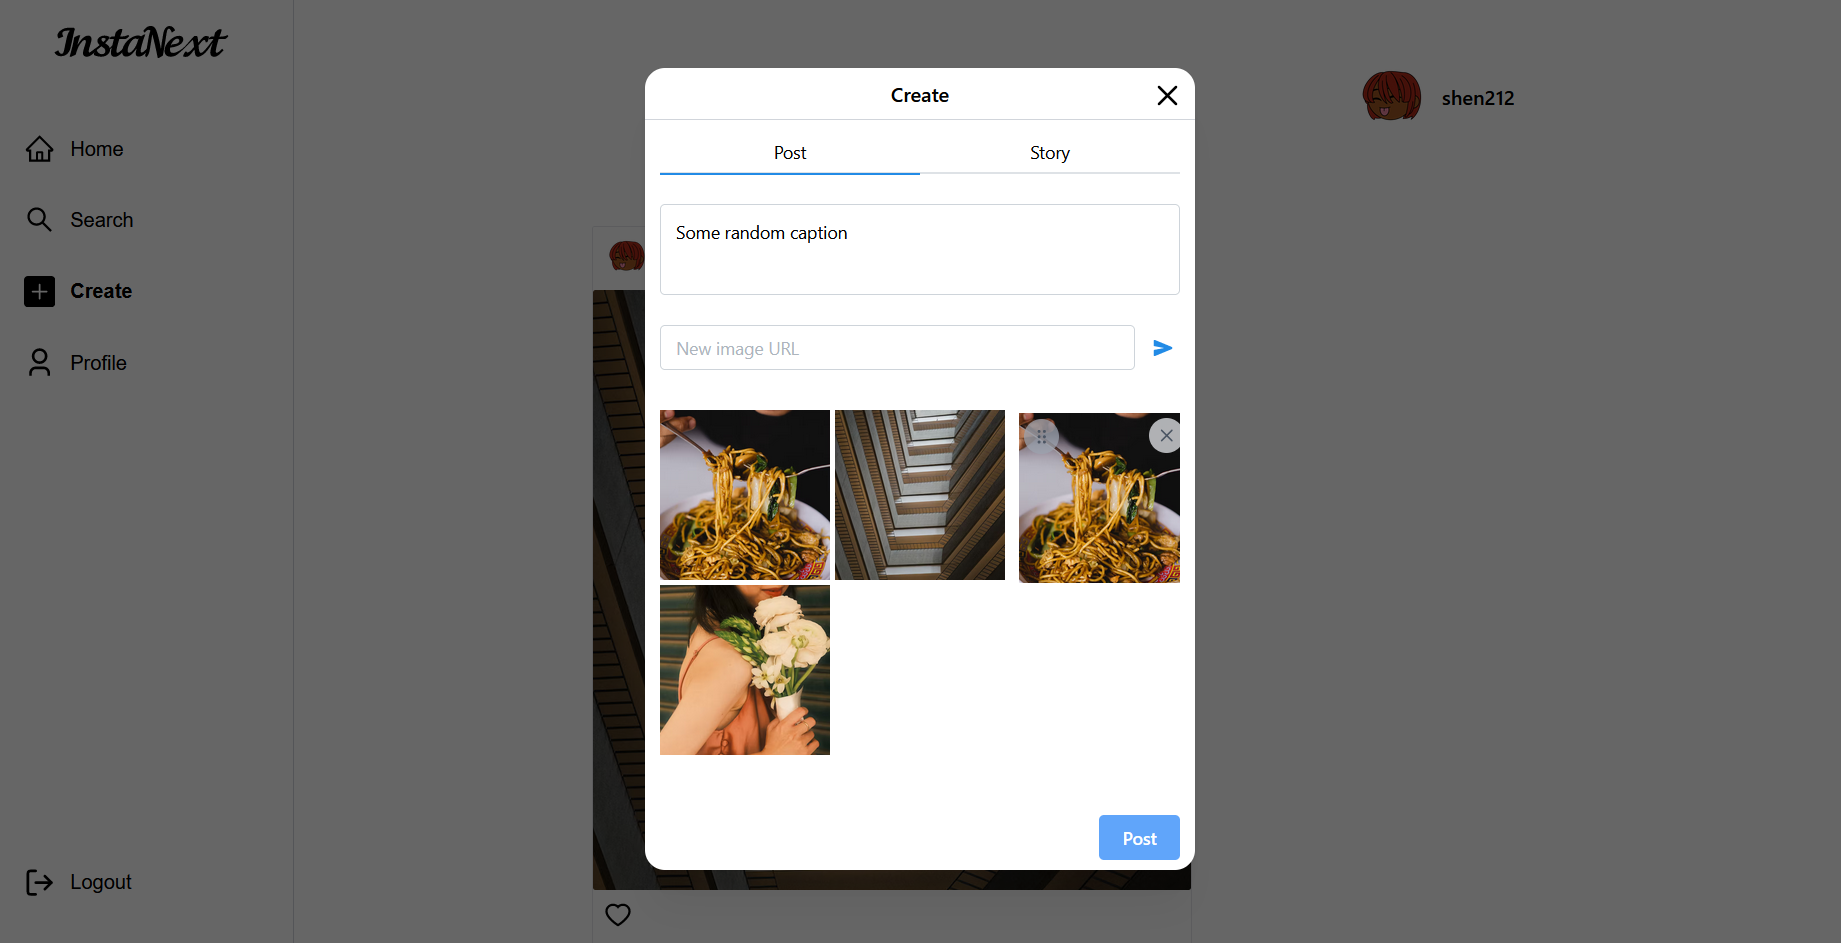
Adding it into CreatePost,
// src/components/posts/CreatePost/CreatePost.tsx
...
      <Textarea
        placeholder="Post Caption..."
        {...form.getInputProps("caption")}
      />

      <ImageUrl
        onSubmit={(values) => {
          form.insertListItem("images", values);
        }}
      />
      <div className="grid grid-cols-3 gap-1 mt-8">
It should work perfectly now!
To get it finally working, let's add in the API and useMutation
// src/api/posts.ts
export const createPost = async (data: CreatePostParams): Promise<CreatedPostData> => {
  const post = await axios.post('/api/posts', data)
  return post.data
}
// src/components/posts/CreatePost/CreatePost.tsx
import { CreatePostParams, createPostSchema } from '@/features/posts/createPost/createPost.schema'
import { useForm, zodResolver } from '@mantine/form'
import { Textarea, Text, Image, Button } from '@mantine/core'
import ImageUrl from './ImageUrl'
import { useMutation } from '@tanstack/react-query'
import { createPost } from '@/api/posts'
import { showNotification } from '@mantine/notifications'
import { useRouter } from 'next/router'
import { modals } from '@mantine/modals'

const CreatePost = () => {
  const router = useRouter()

  const createPostMutation = useMutation({
    mutationFn: createPost,
    onSuccess: () => {
      showNotification({
        message: 'Post Created Successfully!',
        color: 'green',
      })
      // let's close the modal send the user back to front page
      router.push('/')
      modals.closeAll()
    },
  })

  const form = useForm<CreatePostParams>({
    validate: zodResolver(createPostSchema),
    initialValues: { caption: '', images: [] },
  })

  return (
    <form
      onSubmit={form.onSubmit((values) => {
        createPostMutation.mutate({
          caption: values.caption,
          images: values.images.map((image, index) => ({
            ...image,
            // updating the sequence following the current arrangement
            sequence: index,
          })),
        })
      })}
    >
      <Textarea placeholder="Post Caption..." {...form.getInputProps('caption')} />

      <ImageUrl
        onSubmit={(values) => {
          form.insertListItem('images', values)
        }}
      />
      <div className="mt-8 grid grid-cols-3 gap-1">
        {form.values.images.map((image) => {
          return (
            <Image
              src={image.url}
              alt={image.url}
              fit={'cover'}
              key={image.sequence}
              withPlaceholder
              placeholder={<Text align="center">The image is broken</Text>}
              classNames={{
                root: 'aspect-square',
                figure: 'h-full',
                imageWrapper: 'h-full',
                image: '!h-full',
                placeholder: 'bg-gray-100',
              }}
            />
          )
        })}
      </div>
      <div className="mt-12 flex justify-between">
        {/* Needs to validate the images in a way */}
        <div className="text-red-500">{form.errors['images']}</div>
        <Button
          type="submit"
          className="bg-blue-400 hover:bg-blue-500"
          loading={createPostMutation.isLoading}
        >
          Post
        </Button>
      </div>
    </form>
  )
}

export default CreatePost
However, we can't see our post on the front page! Looking back at our implementation for posts/findFollowingPosts.ts, it gives us a hint. We should also include the posts from the current user.
// src/features/posts/findFollowingPosts.ts
const findFollowingPosts = async (userId: string) => {
  const posts = await prisma.post.findMany({
    include: {
      user: true,
      _count: {
        select: {
          liked_bys: true,
        },
      },
    },
    orderBy: { created_at: "desc" },
    // Using an OR to find posts of both ends
    where: {
      OR: [
        {
          user: {
            followers: {
              some: {
                follower_id: userId,
              },
            },
          },
        },
        {
          user_id: userId,
        },
      ],
    },
  });
Opening our front page again, we can now see the newly posted post, woohoo!

Maybe we should refresh our front page query upon post submission, we can do that using useQuery. Using refetch, we are instructing all the queries with the same queryKey to make the GET request again.
// src/components/posts/CreatePost/CreatePost.tsx
...
  const router = useRouter();
  const postQuery = useQuery({ queryFn: getAllPosts, queryKey: ["all-posts"] });

  const createPostMutation = useMutation({
    mutationFn: createPost,
    onSuccess: () => {
      showNotification({
        message: "Post Created Successfully!",
        color: "green",
      });
      postQuery.refetch();
      // let's close the modal send the user back to front page
      router.push("/");
      modals.closeAll();
    },
  });
...
You can try reuploading again, it'll be working perfectly!
Bonus: Gallery Style Post Creation
Remember earlier I said we should let the user rearrange the images? At the same time, they should be able to delete the images.
To do this, I'll use dnd-kit library, let's install the necessities
yarn add @dnd-kit/core @dnd-kit/sortable
While I'd love to show you how it's done, this article will go a little too long if I include them here.
Do stay tuned for a future article (finger-crossed) on it.
Nonetheless, head over to the GitHub and copy all the components from src/components/sortable over to your local. Then, you can simply use the SortableImageGrid like so
// src/components/posts/CreatePost/CreatePost.tsx
...
      <ImageUrl
        onSubmit={(values) => {
          form.insertListItem("images", values);
        }}
      />
      {/* Replacing the old div grid */}
      <SortableImageGrid
        images={form.values.images}
        setImages={(values) => form.setFieldValue("images", values)}
        onRemove={(index) => {
          console.log("Removing " + index);
          form.removeListItem("images", index);
        }}
      />
      <div className="flex justify-between mt-12">
And voila, you'll get the sneak peek of this article!
Story Creation
I don't know if you're expecting this or not, but the story creation part will be left to you as a challenge! Don't worry, you don't need the SortableImage thing, so everything will be straight forward like CreatePost
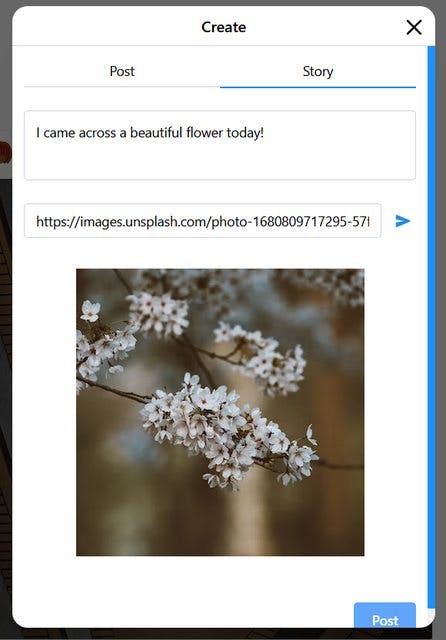
If you'd like to check my implementation, here they are:
At the same time, I've refactored the ImageUrl component so that it can be used here too. I moved it to src/components/images/ImageUrl.tsx, so I also moved the CreatePost component one level up as the directory only contains one component now. The new location for CreatePost is src/components/posts/CreatePost.tsx
Summary
Phew, yet another very long article. I like how the longest part has always been the frontend. It took me 2 hours or so to get the dnd-kit working nicely.
This part has demonstrated how to make POST requests in Next.js and call them using useMutation from the frontend. You should also know how to validate the request bodies from the backend and the form inputs from the frontend using Zod alone.
We will look into the Follower and Post Liking logic in the next part!
As usual, here's the full codes for this part: GitHub