- Published on
Insta-Next: Sweatless React State Management with Zustand

- Authors

- Name
- Hoh Shen Yien
Table of Contents
Are you still using Redux for your state management? If you're like me, you probably don't like it too.

Redux used to be my nightmare while working in React. The states, actions, reducers were scattered everywhere, side effects in places you least expected, lots of boilerplate codes for a single state, etc.
Therefore, we will look into something simpler and more enjoyable state management library today, Zustand.
If you decided to follow along the codes but didn't catch up the last parts, check out the codes from my GitHub.
State Management
Yes, with tools like React Query that caches requests, the need for temporarily storing requests' results will decrease. However, there are still moments when we'd wish to pass the data from one component to another.
That's where Global State Management comes into play, it allows us to create global data storage for the frontend. Context is also an option in React but is bad for large-scale performance.
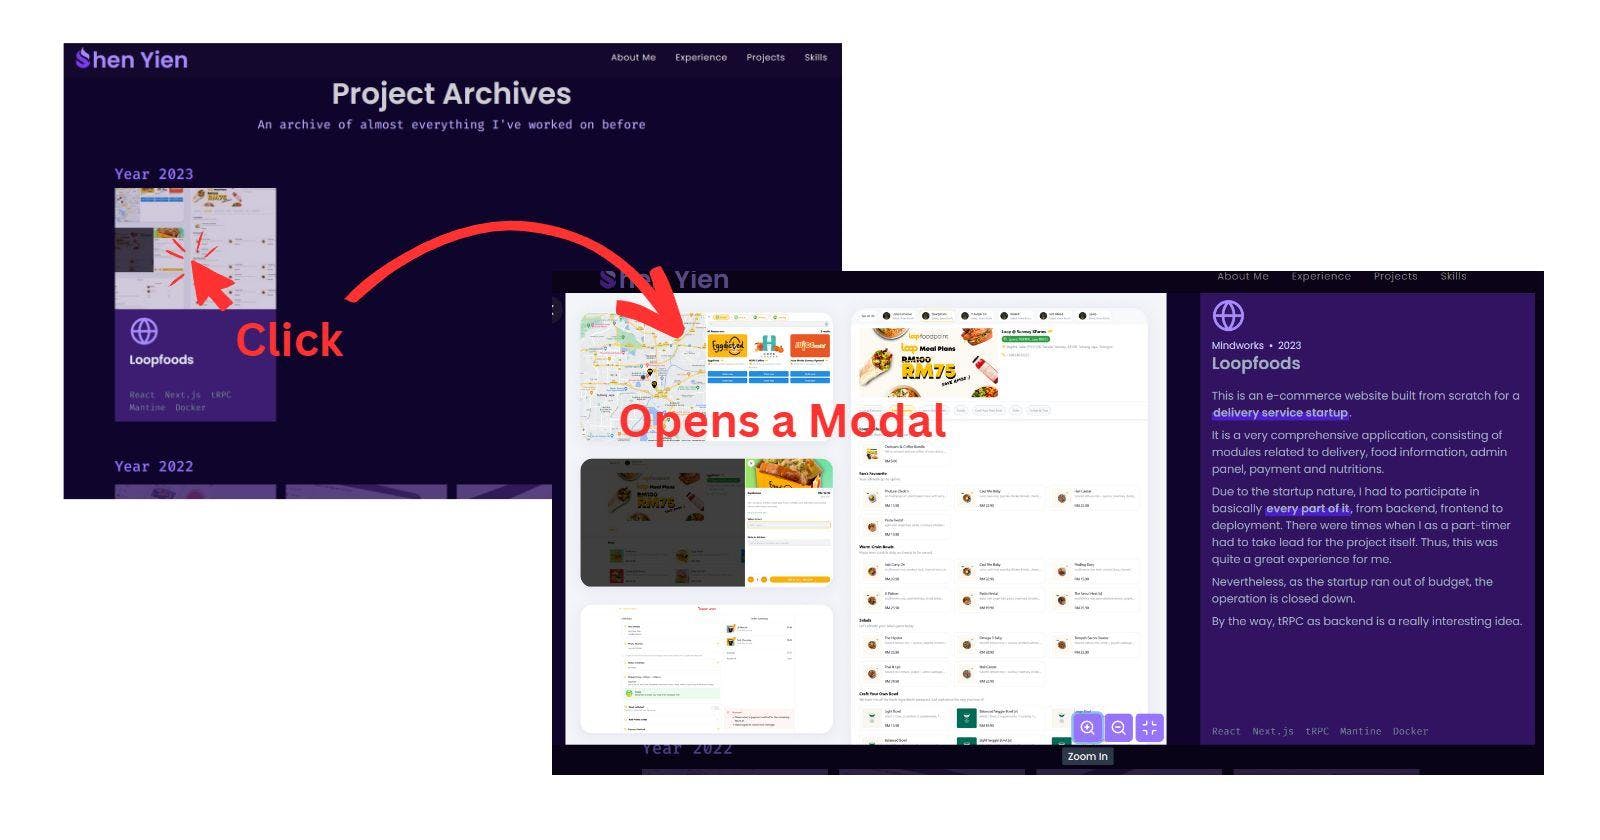
Using my website as an example, a modal for project details will show up upon clicking one of the projects.
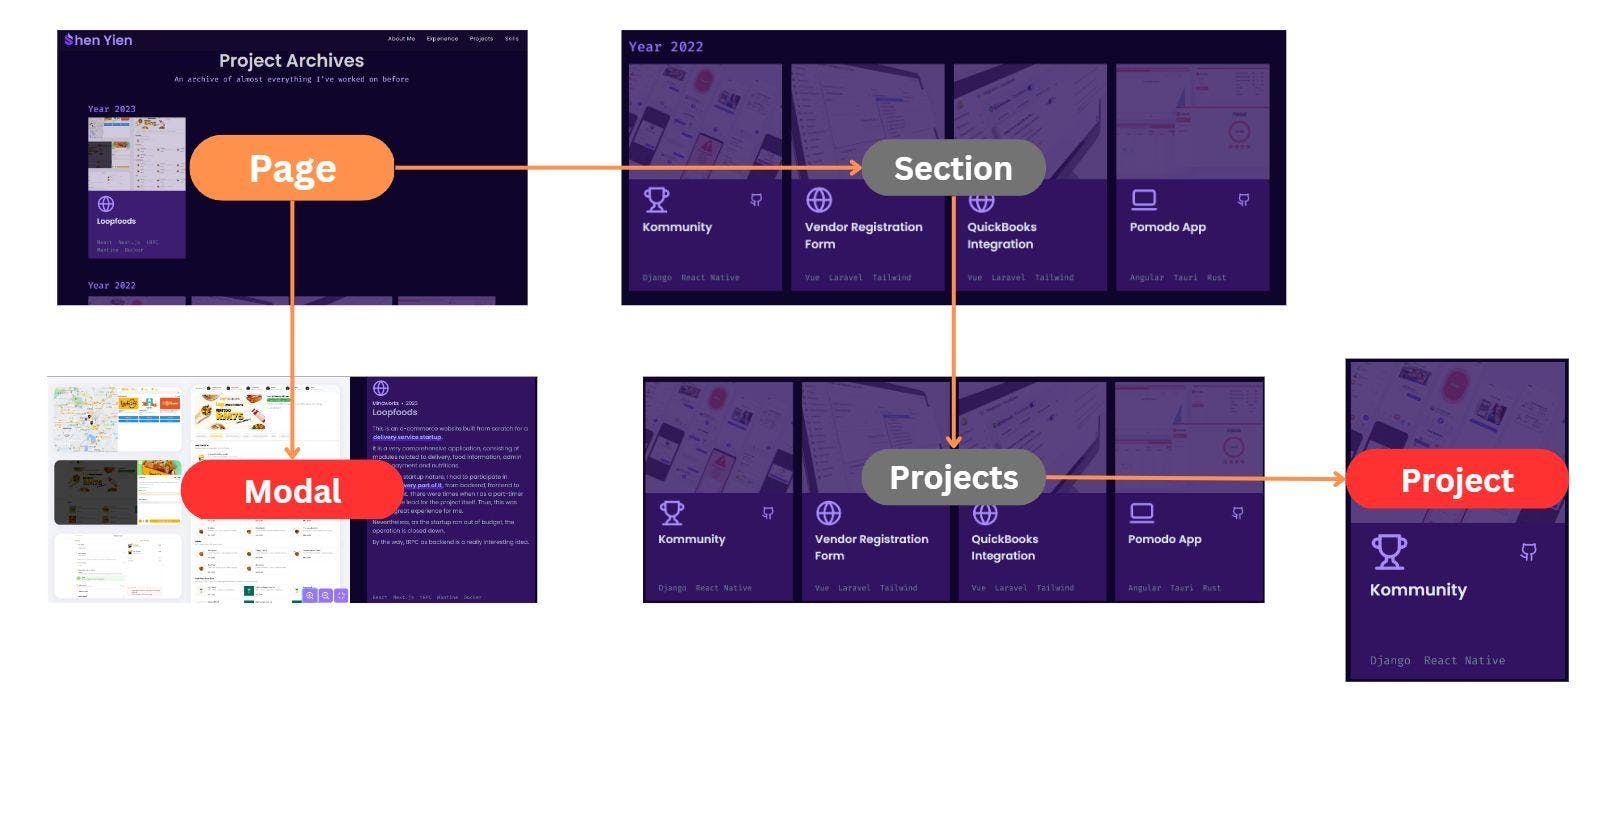
Let's say the modal component is placed on the page level, and the project is nested a few layers down the component tree. The data now is contained in the Project component, but required by the Modal that is placed under the page.

Without State Management, we will typically be using the plain useState. The state will lie on Page, while the setter will be passed down the component tree to Project so that the Project component can set it during onClick, and the Modal will consume the state.
Without a single doubt, the complexity will put a lot of cognitive burdens and makes it difficult to maintain the codes, especially as it scales.
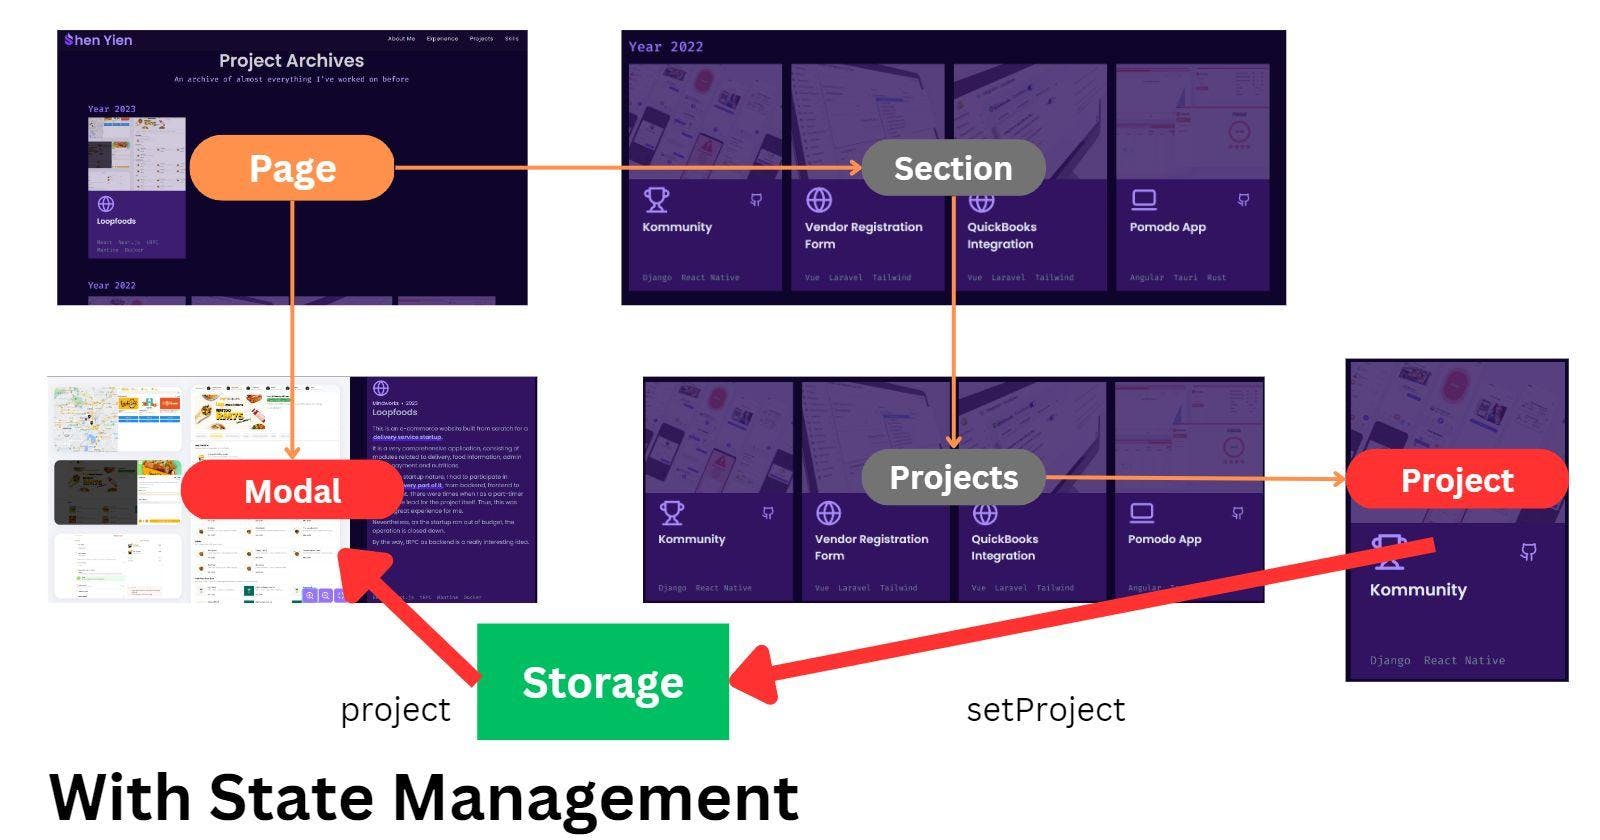
Using State Management, everything will be simplified. The components only needed to communicate with the data storage without having extra props passing down from the top.
Of course, not everything needs state management. Normally, I'll only use State Management when the flow is complex and at least more than 2 layers deep. (Take this with a grain of salt, this is just my heuristics)
What are we building

In Part 8, we built a follow button that doesn't immediately reflect the follow status after clicking (it technically does, we used a temporary solution there).
The problem with it? The frontend is using outdated data and is waiting for a response from the backend. Hence, we will fix this issue by storing an object of followed users using Zustand. This allows the frontend to keep track of users that are followed and unfollowed before receiving updated data from the backend.
(There might be better solutions, but this works)
Zustand

Like Redux, Zustand also allows you to manage the frontend's global states in a simplified manner. Do check out their docs to learn more about it! I only covered the essentials here.
Note: Zustand isn't bound to React, it can also be used in vanilla JavaScript and other frameworks.
Installation
Zustand is only a single package,
yarn add zustand
and there isn't additional configuration required, so we're ready to go!
Data Store
In Zustand, a store is basically a hook for a group of related data. For example, in E-Commerce, you might have stores like CartStore, PaymentStore, and UserDetailStore.
The store will contain the data, and any function that interacts with the data (setters, reducers, async actions, etc.).
Store Type
As usual in the TypeScript world, we will define the structure of the store first, let's see, we will store the followed user as an object
// src/stores/useFollowedUserStore.ts
// Since it's a hook, the use is in the file name
type FollowedUser = Record<string, boolean>
If we click on Follow button, the user's username will be added to FollowedUser and set to true. If unfollowed, it'll be set to false instead. Let's try to combine these functions
// src/stores/useFollowedUserStore.ts
...
export interface FollowedUserStore {
    followedUser: FollowedUser;
    followUser: (username: string) => void;
    unfollowUser: (username: string) => void;
    reset: () => void; // added this to reset the followedUser object
}
Create Store
Next, we will create the store based on the type we defined
// src/stores/useFollowedUserStore.ts
import { create } from "zustand";
...
const useFollowedUserStore = create<FollowedUserStore> ((set, get) => ({
    followedUser: {},
    followUser: (username) => {
        set({followedUser: {...get().followedUser, [username]: true}})
    },
    unfollowUser: (username) => {
        set({followedUser: {...get().followedUser, [username]: false}})
    },
    reset: () => {
        set({followedUser: {}});
    }
}))

export default useFollowedUserStore;
Using create from the Zustand, we will also pass the type created in.
There will be two parameters here, set and get. get() will return the current state of the store, while set() will update the store state with the data.
I.e., If I passed followedUser in set, only followedUser field will be updated, other fields will be unaffected.
And that's it, the amount of work here is like much lesser compared to other state management tools.
Persistent Storage
Note that the version implemented above isn't persistent, that is, if you close the tab, everything is gone.
While this is the behavior desired for our implementation, you might want to persist some data sometimes. For example, you might want to persist user's details until they log out, so closing the website doesn't lose the data.
To achieve that, we can use the persist middleware, just simply wrap the store in it, it will use the browser's localStorage by default:
// // src/stores/useFollowedUserStore.ts
...
// Note the extra () there
const useFollowedUserStore = create<FollowedUserStore>()(persist((set, get) => ({
    followedUser: {},
    followUser: (username) => {
        set({followedUser: {...get().followedUser, [username]: true}})
    },
    unfollowUser: (username) => {
        set({followedUser: {...get().followedUser, [username]: false}})
    },
    reset: () => {
        set({followedUser: {}});
    }
}), {name: "followed-user"}));

export default useFollowedUserStore;
PS: I'm using the non-persistent version
Using the Store
It's dead simple to use the store, we just call the hook and that's it
const { followedUser, followUser } = useFollowedUserStore()
Fixing the frontend
Let's head back to our FollowUserButton, instead of useState, we will use the store we created
// src/components/users/follows/FollowUserButton.tsx
  // I also removed the modal in this component
...
  const {
    followedUser,
    followUser: stateFollowUser,
    unfollowUser: stateUnfollowUser,
  } = useFollowedUserStore();

  const followUserMutation = useMutation({
    mutationFn: followUser,
    onSuccess: () => {
      showNotification({
        message: "You have followed the user!",
        color: "green",
      });
      // we will update the state in store directly
      // after successful request
      stateFollowUser(username);
      onChange?.(true);
    },
  });
  const unfollowUserMutation = useMutation({
    mutationFn: unFollowUser,
    onSuccess: () => {
      showNotification({
        message: "You have unfollowed the user!",
        color: "green",
      });
      stateUnfollowUser(username);
      onChange?.(false);
    },
  });
  // Only use data from backend if frontend hasn't record
  const following = followedUser[username] ?? initialFollow;
...
Besides this file, there are a few files to update too. However, since this post is meant to be a Zustand tutorial, I won't bother you with the details. Here are the updated files for your reference:
Everything except
types.tsfromsrc/utils/modalsfolder: GitHubJust needed to uncomment all the temporary fix from Part 8
src/components/users/follows/FollowUserButton.tsx: GitHubI removed everything about the modal here
Optimizing Data
Noticed the reset function from earlier? Since the data is updated when we refetch the data from backend, we will reset the followedUser object after refetching.
To do this, we can simply call the reset function after every successful refetch:
// src/components/users/UserInfo.tsx
...
  const { reset } = useFollowedUserStore();
  const { data: userInfo, isSuccess } = useQuery({
    queryFn: () => getUserInfo(username),
    queryKey: ["user-info"],
    enabled: !!username,
    onSuccess: (data) => {
      setActualFollowing(data.user.followers.length > 1);
      // Here
      reset();
    },
  });
...
// src/components/modals/PostLikedModal.tsx
...
  const { reset } = useFollowedUserStore();
  const likedUsers = useQuery({
    queryFn: () => getPostLikeds(postId),
    queryKey: ["post-likeds"],
    onSuccess: () => {
      reset();
    },
  });
...
Note that this step is completely optional, might even be redundant since the users probably won't follow a lot of other accounts at once.
Moreover, this data will be removed once the user closes or refresh the page, so this optimization is unnecessary.
Summary
This is a relatively short article in the series since it solely focuses on Zustand.
To summarize, you have learned about the reasons behind state management, how to setup a Zustand store by creating types and the store itself, and using Zustand stores in React.
I hope you can see the simplicity of setting up Zustand (especially compared to Redux if you have used it before), so let's advocate for Zustand and convince more people to use it! Let's hope that Zustand will become mainstream one day.
The complete codes for this part can be found here.